Pages

Showing posts with label vacation. Show all posts

February 27, 2013

Weekender Tote

This is a big, BIG tote. Until recently, I've not had much need for a tote this size. When we were out in Kansas City we didn't make a lot of weekend trips. Now that we are back in New York and close-ish to family and friends we are making short trips rather frequently.


This bag holds all you need it to. A laptop, chargers, books/kindle, an extra coat, knitting, notebooks. You name it I can fit it in there. Also there are pockets all around the inside for a phone, wallet, keys, etc.


And there is still some room...


I made a smaller version of this tote a while back. The idea came to me while I was working at Hallmark, hence the draft on a card divider. I got so many compliments on that smaller tote that I decided to make a larger version.


I'll be testing out the functionality of this one tonight when we head up to my mom's for a few days.


Update:
The tote was perfect for our four-day visit!


Chocolate!

One of the best parts of being on vacation is getting to reconnect with friends that me and the mister don't get to spend a lot of time with on a regular basis. Among all the crafting and Diablo playing, I made sure to fit in a few visits. 

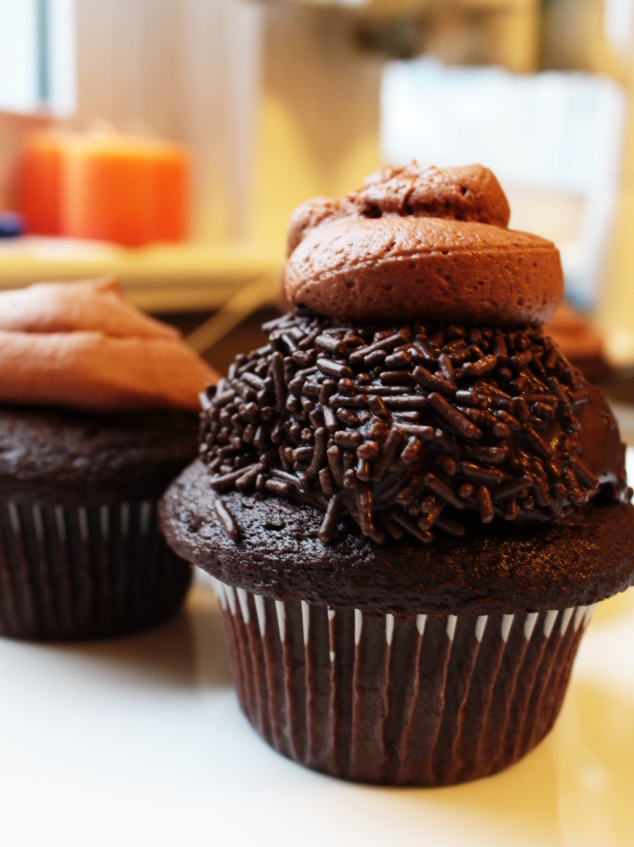
Yesterday, we headed west to visit some friends of ours for dinner. They graciously offered to cook, so I agreed to bring the dessert. Upon asking if there were any requests, I got a response of "chocolate!" nearly instantly. So I hopped on Pinterest to see what I could make that was chocolate. I settled on these little insulin shockers from Beantown Baker.

They are called "quintuple" chocolate cupcakes, but if two layers are the same can you count them separately? Your call. I'm going to refer to them as quadruple chocolate cupcakes. Either way they are delicious, but very, very rich. I was the only one at dinner that made my way through an entire cupcake. (Maybe I should have kept that little secret to myself...nah, I'm ok with it.)


These beauties start with a dark chocolate cake. Then a layer of chocolate cream cheese frosting. Followed by chocolate glaze and chocolate sprinkles. Finally, top them off with another small dollop of cream cheese frosting.


I made a few variations with this batch. I tried a few without the sprinkles, and some with just the cream cheese frosting.


If four different layers of chocolate are too many for you, but you're looking for a great chocolate cake recipe, I would highly recommend this one. I don't make a lot of chocolate cakes or cupcakes, but this recipe may change that. It was an easy recipe and the cake comes out rich and moist. It really doesn't need anything else, it is wonderful on its own. As an added bonus the chocolate is melted from the heat of other ingredients, away from the stove top, so no worries about burnt chocolate. This recipe calls for the batter to sit for an hour at room temperature though, so make sure you aren't in a rush to get it in the oven.

Tonight, we'll head north to visit some of my family. Tomorrow, we'll be going to dinner at another friend's house. Same plan as before...they will be cooking a delicious dinner and I'll bring the dessert (it's kind of my thing). And same as before, when I asked for requests I was met almost instantly with "chocolate!" as the response. So back to Pinterest to find more chocolate masterpieces for me to recreate.


February 23, 2013

Vacation Crafting

Since 2009, I have bounced around from crappy retail jobs to grad school. From great jobs that lose funding, to right-place-at-the-right-time jobs that end too soon because of a move. Needless to say, I was never anywhere long enough to rack up any vacation time. Now that me and the mister are settled back in New York state and I am working at an organization with a great PTO plan, I am on vacation! Real, paid vacation. For 12 glorious days! And I am thrilled about it. I have no plans, no places to go, just me, my crafts, and dinner with my mister every night. Perfect!

I am working to balance crazy crafting and doing nothing. In the crafting moments so far I have decorated a few more storage solutions... 


I switched this one up a bit from my normal yarn-wrapped cans. A little Mod Podge and some scrapbook paper will go a long way!


I also finished a gift wrap organizer project for a friend.

This gift wrap organizer is a simple, but clever little project. I wish I could take credit for the design, but the truth is I would never have thought to flip a stool up-side down and hang bags from it for storage. A non-sewing friend directed me to this tutorial with a pretty-please.

I made a few small adjustments to the tutorial.
For one, I used a patterned fabric with a simple lining instead of the all white bags of this post.

Next, ribbon was used instead of bias tape. It looks prettier, and there is the added bonus of less sewing. Not that sewing is a problem, but sewing ten 24" strips of bias tape is, to me, tedious.


I also made one extra bag. The tutorial shows bags on 3 sides of the stool. I made the executive decision to make bags for all 4 sides.


And finally, again to cut out tedious sewing, I cut all the patterns on the fold. This way you only have to sew up the two sides. Plus it makes the bottom cleaner, and there are no worries about the seams letting loose if you stuff them too full.


The end product is, to quote my friend, too stinking cute!